
Pacifier Holder and Taggie
it is time to start crafting for the holidays! We will start with a quick and easy project for the youngest on the gift list. The elastic loop provides and easy way to attach a pacifier and the taggie gives the baby something to hold onto!
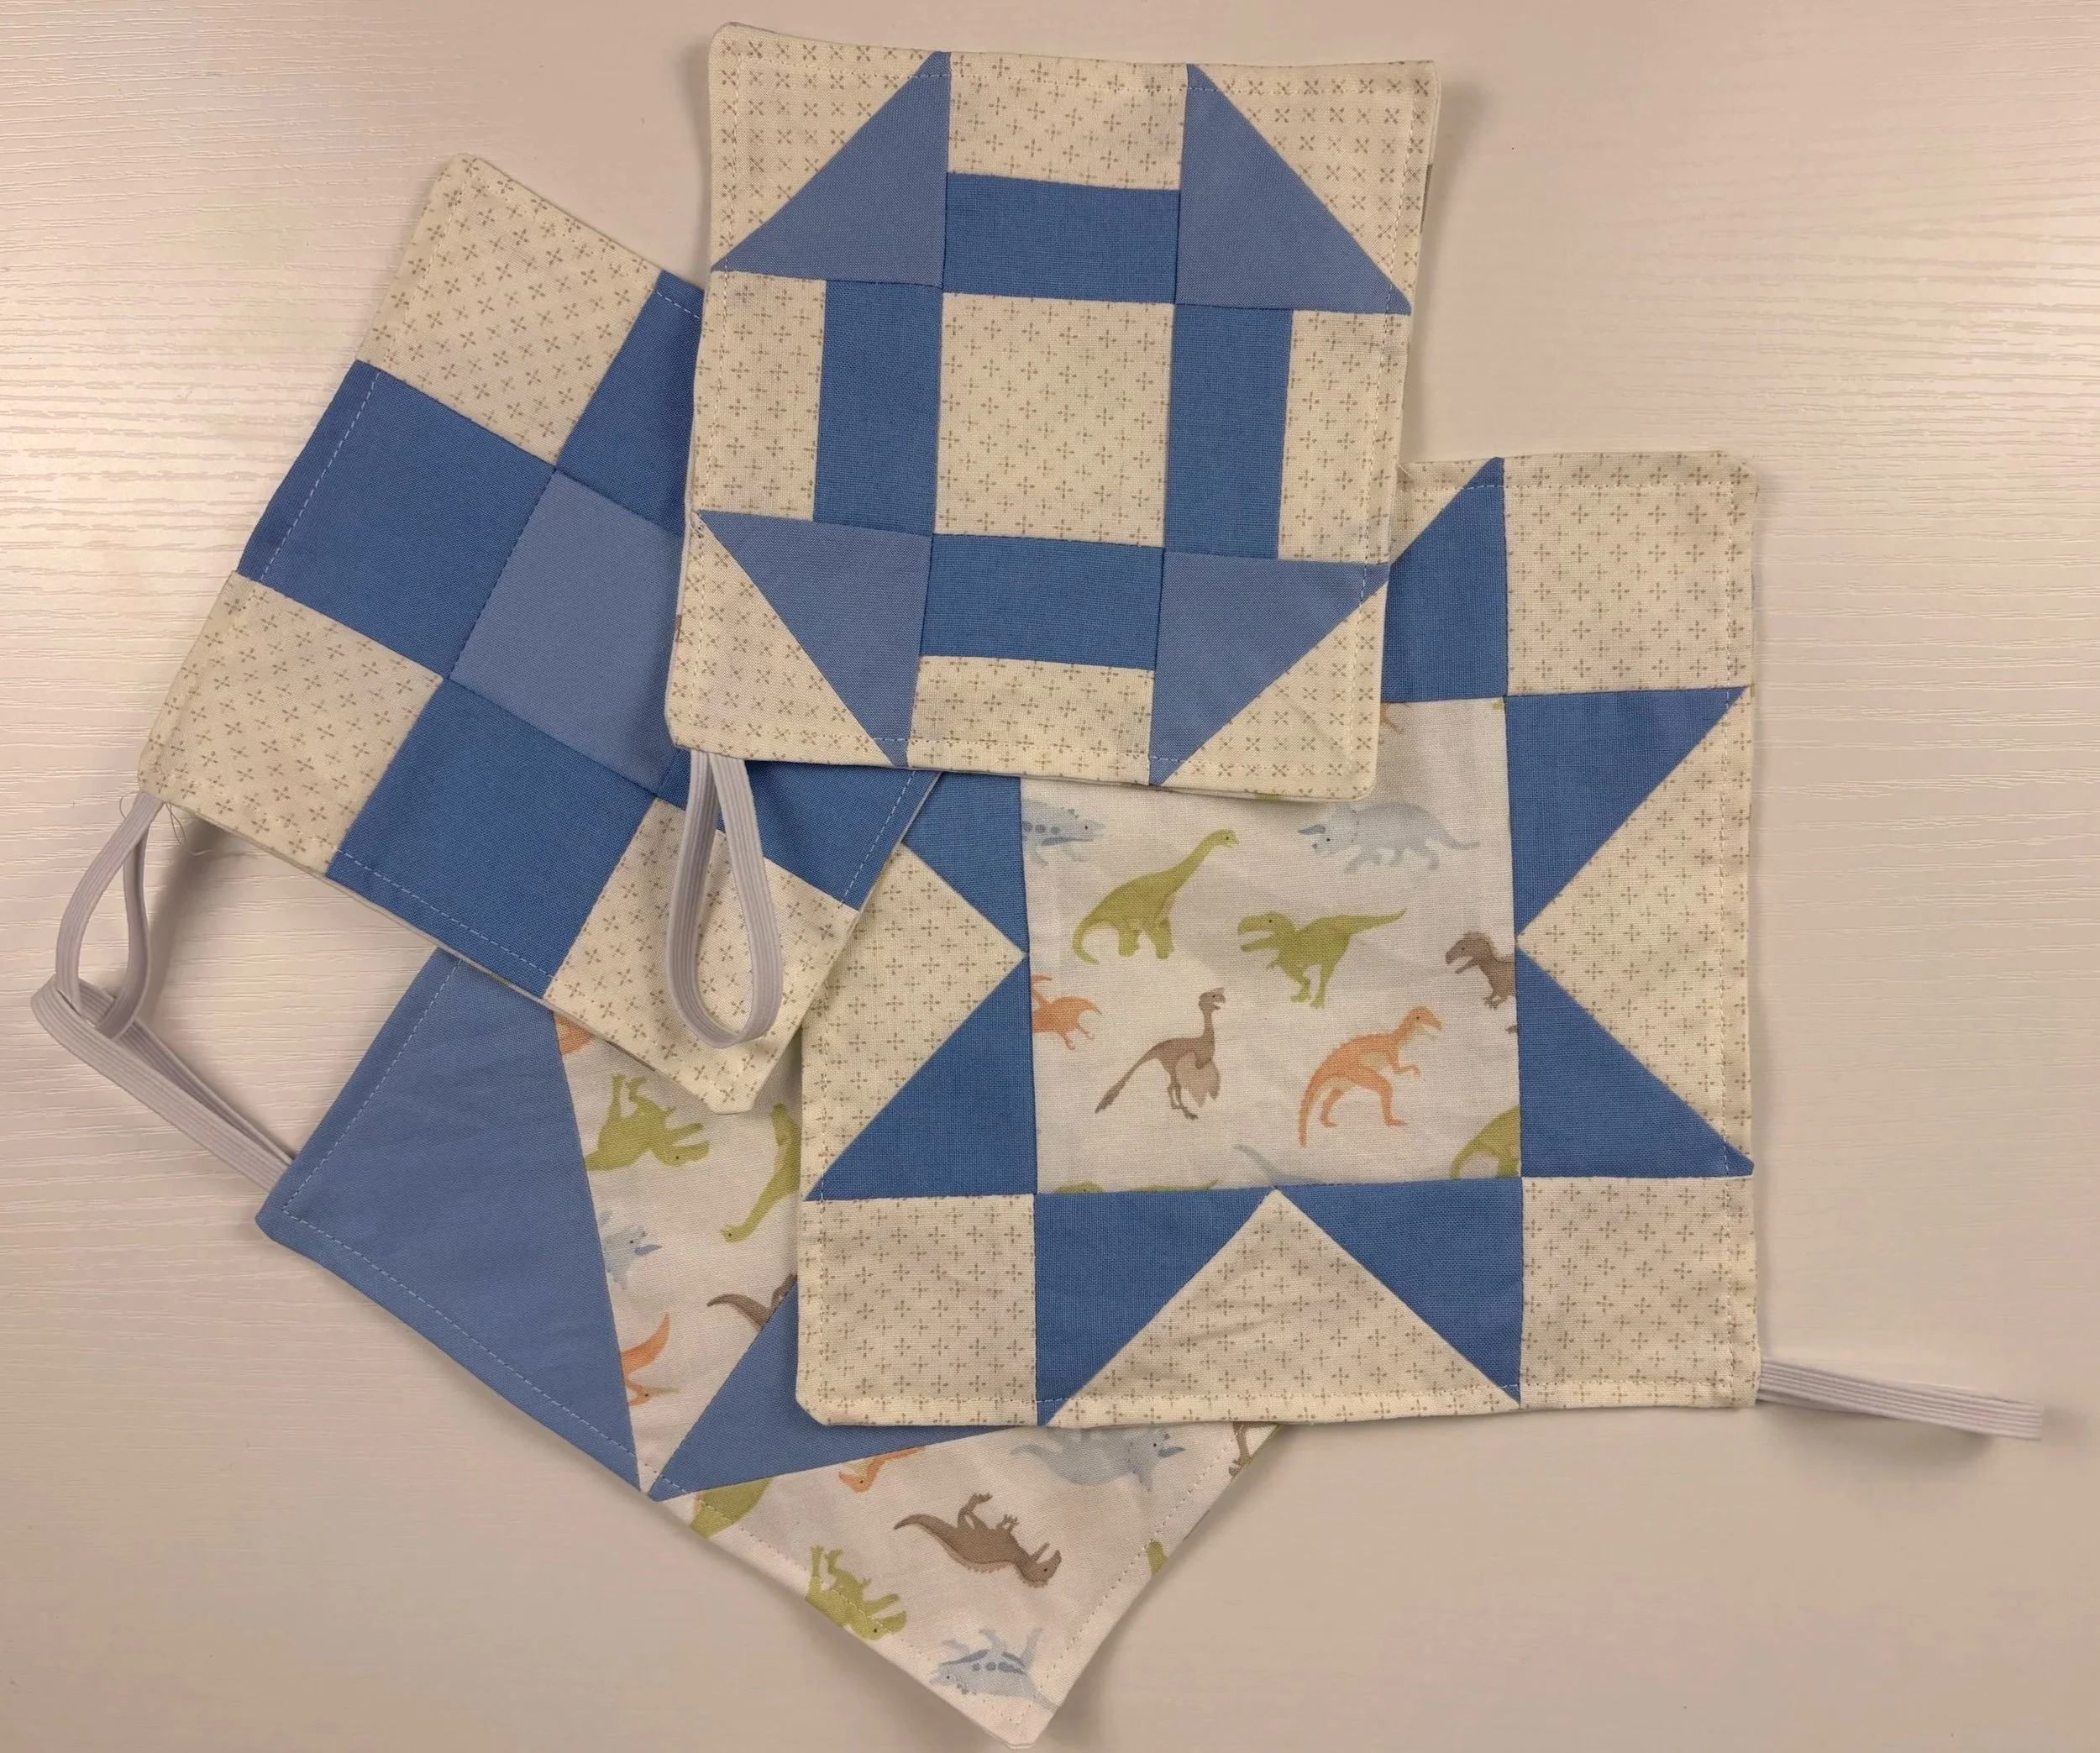
This is the marriage between a taggie and a pacifier clip! I have two sizes and two block designs for each size but the options are endless. First I will give the instructions for the general assembly then the instructions for the quilt blocks if you want to use the blocks I used!
Materials
Elastic - either a hair tie or elastic around 1/4” wide by 5”
Fabric - you need two squares the same size one for the front and one for the back. These can be just squares of fabric or quilt blocks or one of each (I did a quilt block for the top and plain fabric for the back) I used 6.5” and 8.5” squares but these can be any size or shape (a circle could be fun!)
Tools
Sewing machine
Scissors
Iron
Rotary cutter, mat and ruler (not needed but helpful)
Step 1 - Cut your material. As mentioned in the material list you need 2 pieces of fabric (or quilt blocks) that are the same size. If you are choosing to use one of the blocks I used follow that cut list and instructions and come back to here.
Step 2 - Make your sandwich. Layer your front and back piece directly on top of each other keeping right sides together. Pin in place. Fold your elastic in half lengthways and position in between your two layers with the two ends lined up with the edge of the fabric and the loop facing down. I recommend putting the elastic around 3/4” from a corner.
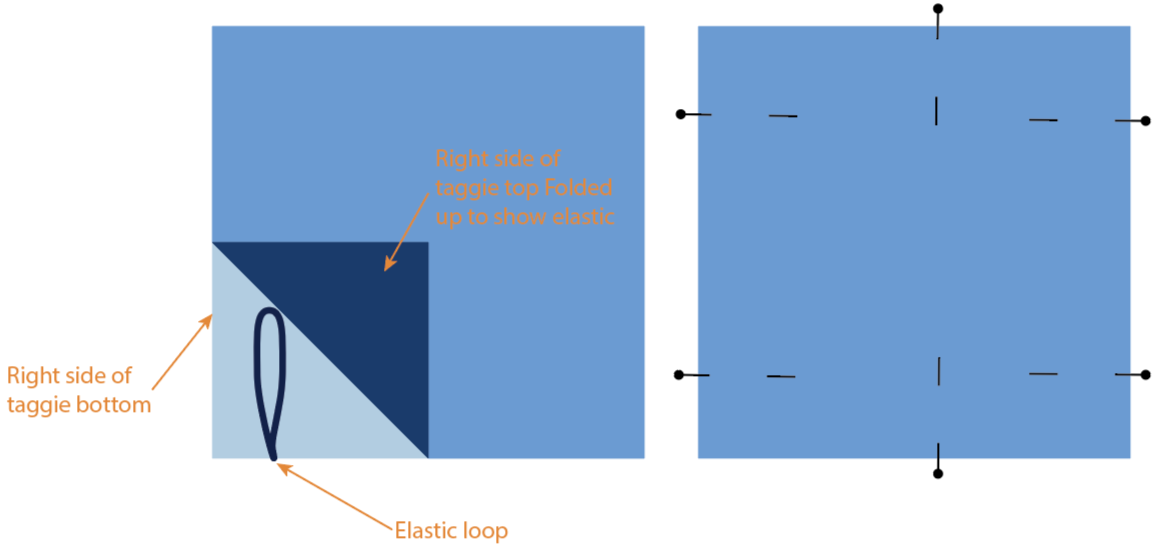
Step 3 - Sew a 1/4” seam around all sides leaving a 2” hole to flip the taggie. Backstitch at the start, end and over the elastic.
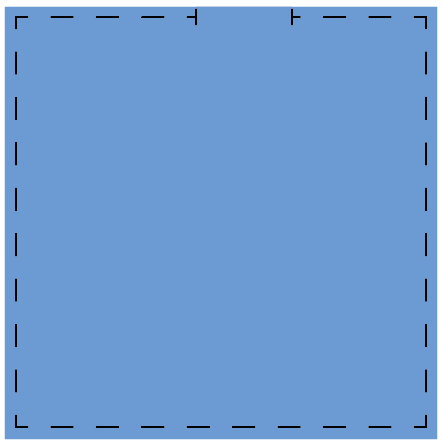
Step 4 - Flip the taggie through the hole and press flat. Make sure to press the flaps from the hole in and even with the edges.
Step 5- Sew a 1/8” seam around the edges of the taggie this will close the hole and keep the layers from shifting. Once you have top stiched around all sides you can add additional quilting lines if desired. You are now done! It is that easy! below you will find instructions for each of the quilt blocks I used for mine.

Sawtooth Star - finishes to 8”

Cut List
Fabric 1 - (1) 5 ½” x 5 ½” square. (4) 2 ½” x 2 ½” squares.
Fabric 2 - (4) 3 ⅛” x 3 ⅛” squares.
Fabric 3 - (1) 4 ½” x 4 ½” square.
Flying Geese Assembly
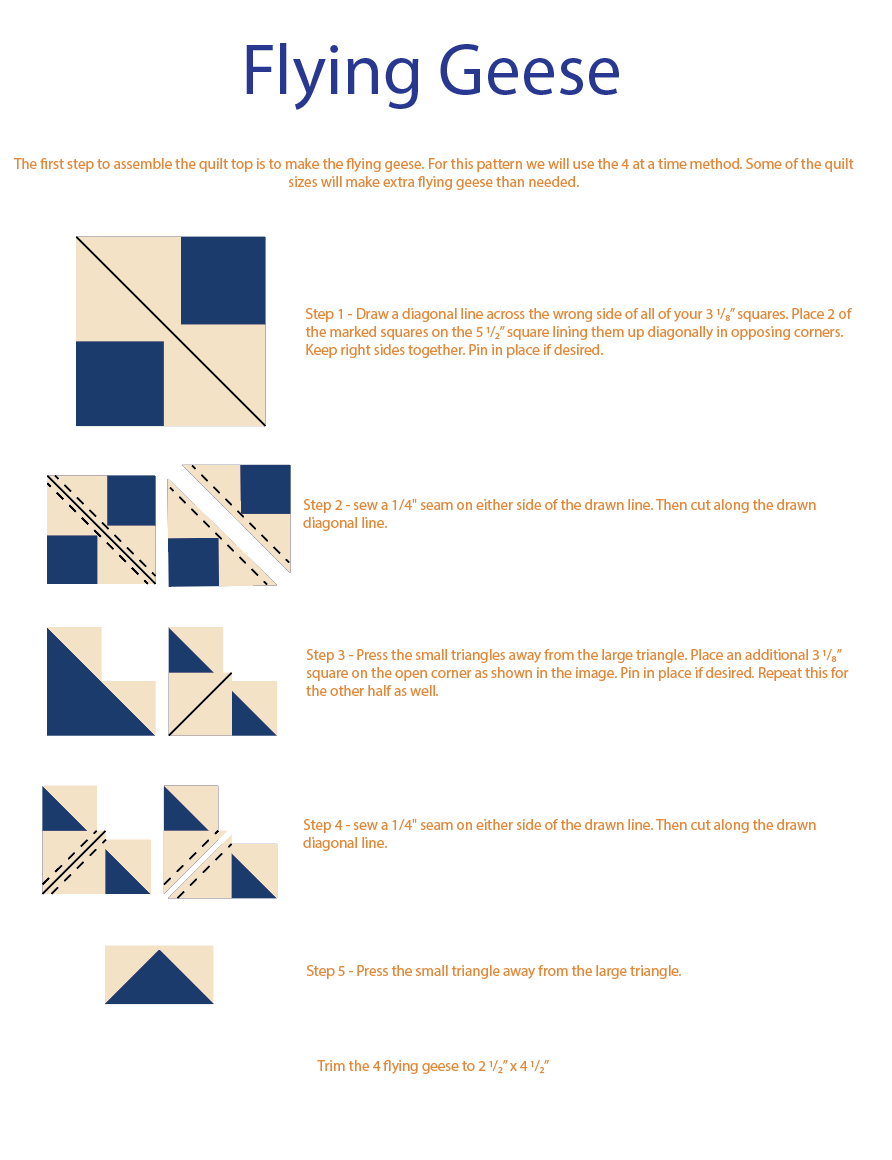
Once your flying geese are complete sew the rows together using a ¼” seam and pressing away from the flying geese. Next keeping the ¼” seem sew the rows together and press open.
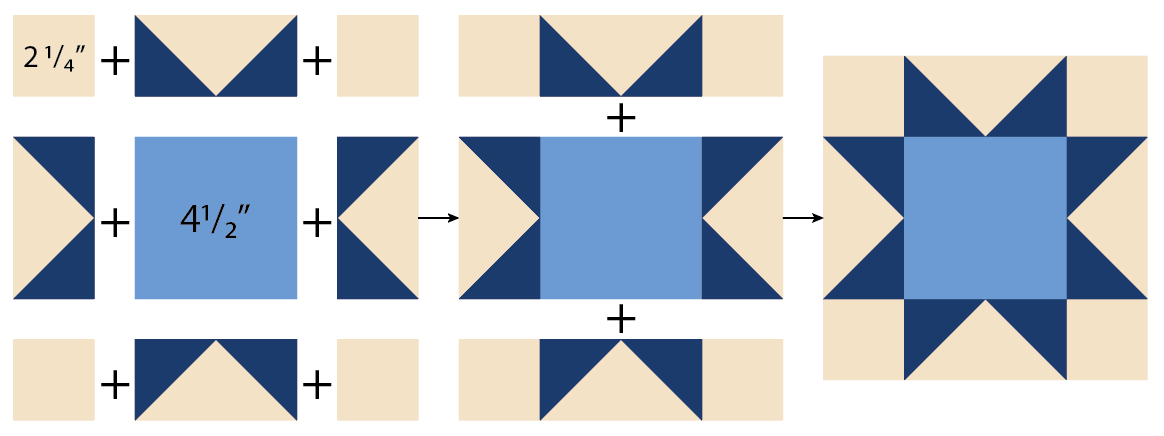
Now your sawtooth star block is complete! It will make a finished 8” pacifier holder but should measure at 8.5” at this point! You are now ready to cut a matching 8.5” block for the back and assemble the pacifier holder.
Tumbling Blocks - Finishes to 8”

Cut list
Fabric 1 - (1) 7 ½” x 7 ½”
Fabric 2 - (1) 7 ½” x 7 ½”
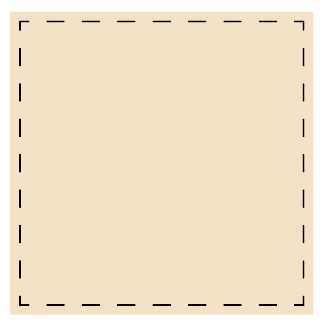
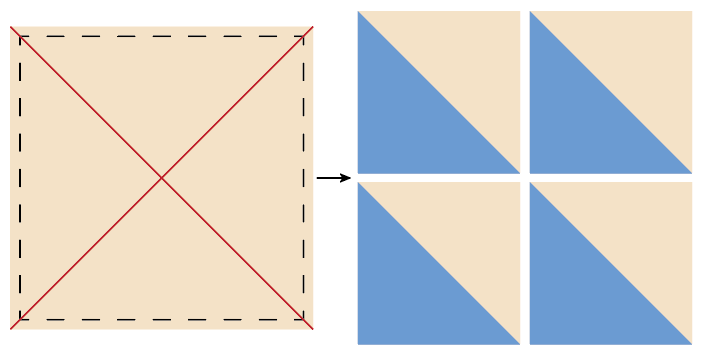
Start by sewing the Half Square Triangles (HST) I used the 4 at a time method. Start by stacking both of your pieces of fabric on top of each other. Keep right sides together. Sew a ¼” seem around all 4 edges of the square.
Next cut the block apart following the red lines. This will give you 4 HST. Press the seams open and trim to 4 ½” x 4 ½”
Next rotate the HST to match the design (or another design you find and like!) Sew the rows together keeping right sides together and a ¼” seem. Press the seams open and sew the rows together.
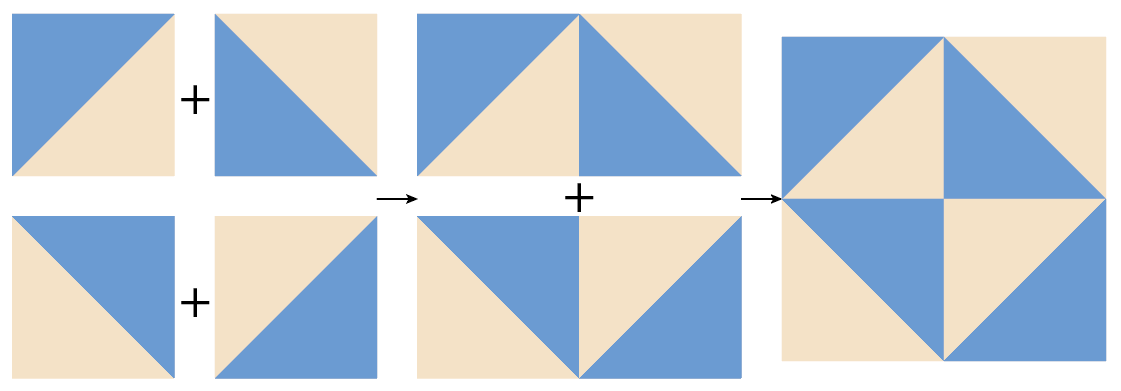
Now your tumbling blocks is complete! It will make a finished 8” pacifier holder but should measure at 8.5” at this point! You are now ready to cut a matching 8.5” block for the back and assemble the pacifier holder.
Churn Dash Block - Finishes to 6”

Cut List
Fabric 1 - (1) 2 ½” x 2 ½” square. (1) 4 ¼” x 4 ¼” square. (4) 1 ½” x 2 ½” rectangles.
Fabric 2 - 1 ½” x 2 ½” rectangles.
Fabric 3 - (1) 4 ¼” x 4 ¼” square.
Start by sewing the Half Square Triangles (HST) I used the 4 at a time method. Start by stacking the 4 ¼” x 4 ¼” squares on top of each other. Keep right sides together. Sew a ¼” seem around all 4 edges of the square.
Next cut the block apart following the red lines. This will give you 4 HST. Press the seams open and trim to 2 ½” x 2 ½”
next sew the 1 ½” x 2 ½” rectangles together in pairs (1 from fabric 1 and 1 from fabric 2) you should have 4 pair in total. Use a ¼” seam and press seams open.

Now all of your pieces are are ready and its time for them to be assembled into the final block. sew the rows together and then sew the rows to each other following the photo below.
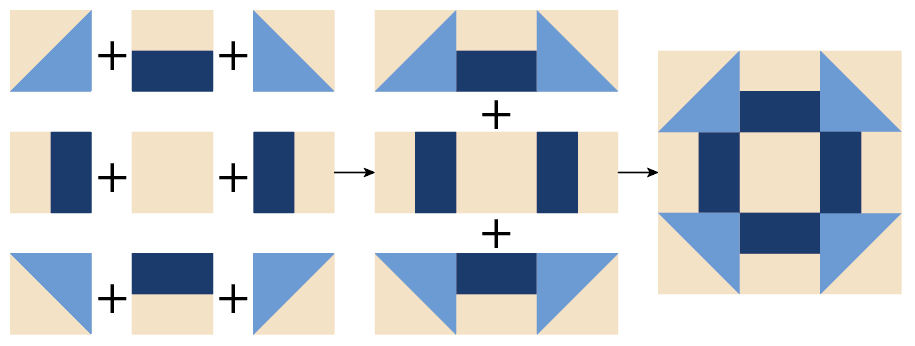
Now your churn dash block is complete! It will make a finished 6” pacifier holder but should measure at 6.5” at this point! You are now ready to cut a matching 6.5” block for the back and assemble the pacifier holder.
9 Patch block - Finishes to 6”

Cut list
Fabric 1 - (4) 2 ½” x 2 ½” squares
Fabric 2 - (4) 2 ½” x 2 ½” squares
Fabric 3 - (1) 2 ½” x 2 ½” square
This is the easiest of all of the blocks to make just cut the pieces, sew the rows, then sew the rows into a block. Keep a ¼” seam allowance and press all seams open.
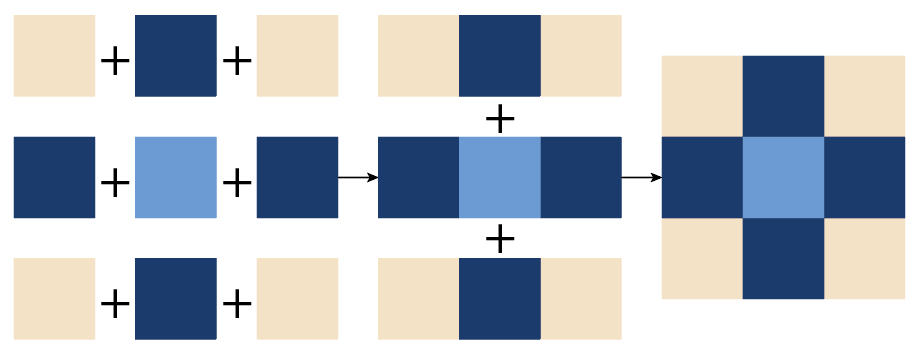
Now your 9 patch block is complete! It will make a finished 6” pacifier holder but should measure at 6.5” at this point! You are now ready to cut a matching 6.5” block for the back and assemble the pacifier holder.
